Templates
- Templates define the individual find dialogue
- Work well in a team
- 6 data types
- Templates base on other templates
Eco:Map is extremely flexible. The feature Templates enables you to customize the individual find dialogue according to your needs.
You decide which attributes are stored, which data type they have and even the order in which they appear. It is your choice whether or not these attributes are grouped into sections.
Five data types are available:
- Logical: Attributes that describe a state e.g. whether a plant is cultivated. Logical attributes are displayed as checkmarks or switches.
- Text: Attributes of this type are displayed as single or multiple lines.
- Information: Attributes of this type are invariable texts.
- Natural number: Typically used to quantify (ranges from 0 to infinite).
- Decimal number
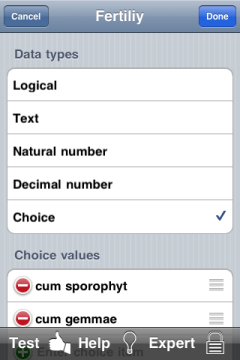
- Choice: You specify a set of values valid for an attribute of this type. An example is the attribute Sex in Eco:Map's individual find dialogue.
Each attribute can have a default value. Default values are values that are written into the database automatically without user interaction unless you change it intentionally.
Templates always base on other templates. There are two preset templates that you can use as starting point for your template:
- Eco:Map: Use this template if Eco:Map's existing attributes in principle suit your needs and you only want to add or remove some of them.
- Base template: This template contains just two sections: Location und Taxonomic Information. For licence reasons you are not allowed to delete the latter one and it will always appear if you use the Catalogue of Life. This template is appropriate if you want to create a template from scratch.
You can create an arbitrary number of templates depending on the nature of your field trips. If you have already generated templates you might use these as a starting point for other templates as well.
Templates are exported like any other data. This means that you could provide other persons with your templates or you can import other persons' templates. In brief: Eco:Map can now be used well in a team.
Tutorial: Mosses
How to do that? We want to create a simple dialogue for mapping mosses.
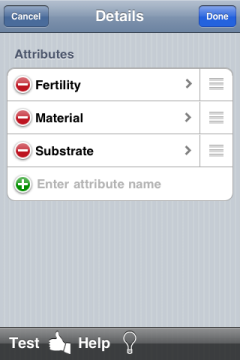
It should have three sections: Location,
Taxonomic Information and
a section with three attributes: Fertility,
Substrate and Material.
At any time you can tap
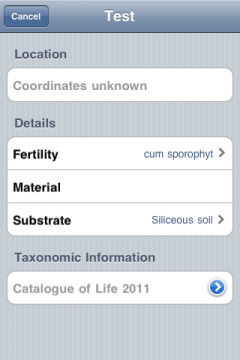
Test  .
The dialogue is then displayed as if you were recording a species.
If you have a question press help
.
The dialogue is then displayed as if you were recording a species.
If you have a question press help  .
.
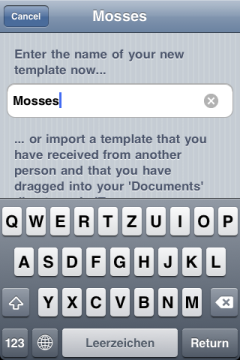
❶
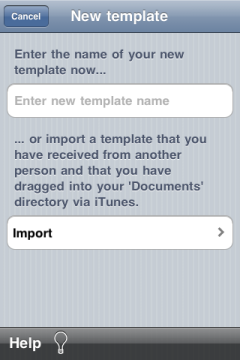
Open the template's dialogue, tap + and enter the template's name Mosses.
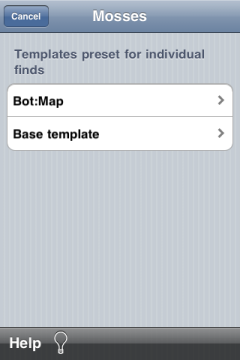
❷
You are asked to choose your template's base. You choose Base template.
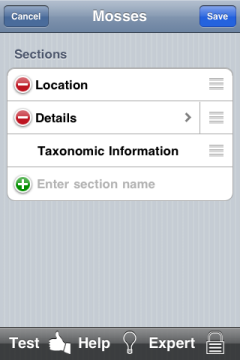
Only the preset sections Location and Taxonomic Information are displayed. Name the new section Details. Tap this name into the empty field. By pressing Return and > you are guided to the attributes of the new section.
❸
Now define your attributes: Fertility, Material und Substrate. Just entering the name of an attribute means that this attribute is of type Logical. Your attributes are expected to be of type Choice. Press the > beside the attribute Fertility.
Here you have to define the attribute's data type. You select Choice. In section Choice values enter cum sporophyt and cum gemmae. The same needs to bedone with the attributes Material and Substrate: Possible value might be 'Maple' or 'Silicious soil'.
❹
Press
Test
to check your dialogue.
Once the dialogue meets your requirements press Done until it changes into Save. Confirm again.
Please note: Before deploying a template you must have selected it in your field trip's dialogue.
Exporting and importing templates
Templates are stored as files with the extension ifd. When exporting a field trip your template is exported as well unless you are working without a template.
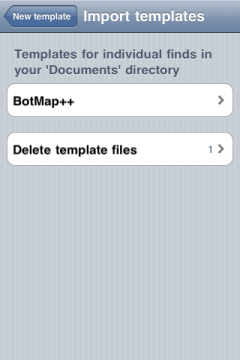
In order to import a template just drag the file via iTunes® into the Documents folder of your device. Open the dialogue New template and tap Import.
In the following view you see all templates in your Documents folder. Tapping a template installs it instantaneously.
Expert mode
Perhaps you have noticed already that there is an
icon Expert  in two dialogues:
- In the dialogue in which you define sections, you can set which attributes are exported for each export type separately. The formats 'CSV' and 'Recorder' even allow you to set the sequence of attributes.
- In the data type dialogue experts can give an alias name to an attribute. That is the name that this attribute has in export files.